Driving back to Eugene today from a trip to Portland I decided to make a quick stop over at Fry's Electronics in Wilsonville, I had been working hard of doing house repairs and needed food, gas, and a little enjoyment of being surrounded by tech. toys. I was hoping for a killer deal on SATA notebook hard drive. Fry's sometimes has great unadvertised specials and who knows this might have been my lucky day.
My hp pavilion has a bay for a second hard drive and I thought that would be a perfect place to install a new version of Free Ubuntu Linux on. I need a new platform to test out Linux software and having it on it's own internal hard drive to dual boot from is a perfect solution.
I wasn't looking for much really, you can get a lot of hard drive these days for not much money and I thought if I could find a $25 deal I would be pretty happy with it. Well today wasn't my lucky day at Fry's, the cheapest drive they had was a 250 Gig SATA for $49.95. It was not the deal I was looking for, the sales person tried hard but I knew I could do better than that.
When I got home I fired up my computer and headed over to ebay, now ebay has a lot of stuff and you can play the buyer game anyway you want. Online auction or if you find a good deal use the Buy It Now button and just get it now. When looking for something like a hard drive or other computer parts your best bet for a good deal is the Buy It Now button. But you have to filter it correctly and you might not find the price you are looking for the first time. But it won't take long for you item/price to pop up.
This is what I did:
I maneuvered through the menus to get to Internal Laptop Hard drives
I then selected 200-299 GB
On the top right of the listing click on the down arrow next to sort
Select Price + Shipping lowest first
On the left I filtered by selected Buy it now - Now I only saw listings with Buy it Now
Scroll past the broken hard drives, and WHALA one listing for $24.99 for a 250 GB Hard drive. They had eight but couldn't guarantee the brand. I wanted more certainty that I was going to get the correct drive. Below that listing was a Toshiba drive for $27 with free shipping, guaranteed to work and the specs were right.This looked like the one. The seller had a good rep so I hit the buy it button. Other ads on ebay had the same drive selling for around $44 so it looked like I had found a good deal.
The drive was used but is no biggie to me and it was essentially the same drive they were selling at Fry's for $49.95
Many people just want to move the product, and don't want to try and hold out for a few dollars more. I once put a 1 Gig Kingston RAM stick on ebay with a buy it button just a little cheaper than what others were selling it for with free shipping and had someone buy it before I had the next thing listed that I was putting on ebay. If you want something to move fast it's always good to do a bit of research on what others are selling for and just beat them at the price.
Dan
Wednesday, March 30, 2011
Tuesday, March 29, 2011
Snake skin touchpad

I would think the first question people would ask is: What does it feel like? Answer: It actually feels very nice to use, it’s textured but my finger slides over it quite nicely. Then the next question is: How did you do this? Answer: By accident but here is how you can do it on purpose:
What I did first was paint 2 coats of Testers #1147 Gloss Black enamel, I then let it dry for 24 hours. Then, I sanded it with the finest steel wool that I could find. It dulled the gloss but was very smooth to the touch.

I then sprayed it with 2 coats of Rustoleum American Accents Matt Clear # 209689. Then let that dry for 24 hours.
When you spray the first coat of Matt Clear the paint starts to change, you wait a few minute then put on the second coat. I wasn’t sure what to think when the clear coat was drying but it was looking pretty nice. The 2 paints had a weird reaction but created a very nice finish. The end result is much better than it was and gives the keypad a nice leathery look.
My wife told me I should do the whole computer and sell it for big bucks. If anyone out there tries this and has some nice pictures to share I will post them with this article.
Dan
Monday, March 28, 2011
Boot disk with virus killer and other tools. Trinity Rescue Kit
OK so your computer is completely hosed by infectious little nightmares. Viruses, Trojan horses, and other malware that decided to mess up your computer and ruin your day. Before you head over to Best Buy to purchase a replacement you should try this. Get a free copy of Trinity Rescue Kit.
Trinity Rescue Kit is a simple bootable CD with Virus software and other tools to fix the mess that your computer is in. The cool thing about it is that it's a Linux CD but you need to know nothing about Linux to use it. You can download the iso file here or if you want a self burning version you can get it here
Or you can order a CD for $2.20 or bootable USB drive for $14.95 with Trinity ready to use. Put the Trinity CD in your drive and make sure your computer is connected to you modem via Ethernet cable. The virus software will connect to the internet and get the latest updates.
Trinity boots up in your computer, gives you options.
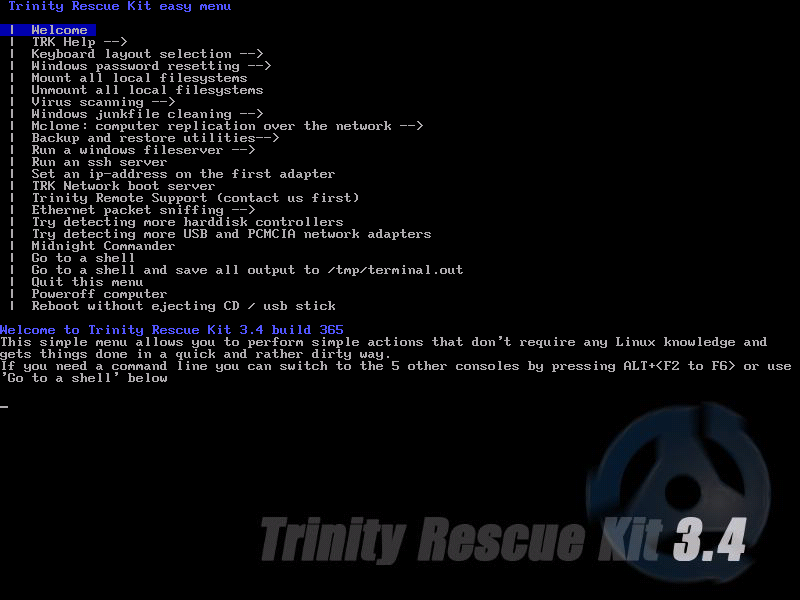 Select virus scanning, you will see several options on the menu. Select an option and let it work on your computer. Here are the options
I think that this is worth a try. Look over the virus scanning options before you start. And I hope this can help you eliminate those nasties.
Dan
Trinity Rescue Kit is a simple bootable CD with Virus software and other tools to fix the mess that your computer is in. The cool thing about it is that it's a Linux CD but you need to know nothing about Linux to use it. You can download the iso file here or if you want a self burning version you can get it here
Or you can order a CD for $2.20 or bootable USB drive for $14.95 with Trinity ready to use. Put the Trinity CD in your drive and make sure your computer is connected to you modem via Ethernet cable. The virus software will connect to the internet and get the latest updates.
Trinity boots up in your computer, gives you options.
Select virus scanning, you will see several options on the menu. Select an option and let it work on your computer. Here are the options I think that this is worth a try. Look over the virus scanning options before you start. And I hope this can help you eliminate those nasties.
Dan
Saturday, March 26, 2011
JZip Highjacked my Homepage!
Don't use JZip for anything. It loads you up with spyware and adds toobars you never asked for, and highjacks your homepage. I recently needed to un-rar a device driver so I did a quick search and found JZip. JZip had the ability to un-rar files compressed with rar so I downloaded, installed, and ran it. It did decompress my file but it also did a lot of sneaky things that took me a while to catch. It had changed my homepage on Firefox to search.jzip.com or something like that and wouldn't let me change it. I ran Superantispyware in safe mode and got rid of a bunch of junk that JZip had installed but it didn't fix the problem with my homepage. I was able to uninstall the bogus toolbar it had installed by going to Control Panel in Windows and simply uninstalling it but my homepage in Firefox and Internet Explorer where still both highjacked.
After doing a bit of research I found a free application called Highjack this by trend Micro to find out what was going on. Now a word of caution, when using Highjack this only remove files you know shouldn't be there. This program can help you find and correct a Highjacked homepage but you need to know what you are looking for. What I found was a line for a Google toolbar that wasn't authentic, and another line for a toolbar that I never installed. I never install toolbars so I checked the box next to the line on both of them and my homepage issue was fixed. I was able to change my homepage back to what I wanted it to be. I needed to restart my computer to see the results because the highjacking was done at startup. I then ran Malwarebytes in safe mode to make sure my computer was clean and called it good.
If you are looking to simply unzip a .zip file you can use windows to do it for you, you simply select the icon with a zipper on it and then select extract all files. The files will be extracted to a folder created in the same directory as the zip file.
If you need a full featured Zip utility that will extract different types of compressed files like rar, lzh, etc. then use 7-Zip to take care of it for you.
What really amazes me is all of the advertisements for JZip that pop up when you search for a zip utility. The people who wrote this piece of trash should be put in handcuffs and hauled in for an atomic wedgie.
Dan
Friday, March 25, 2011
How To Install And Uninstall Windows Drivers
The installation and un-installation process is not very difficult and won’t require any experience or specific knowledge. Once you’ve done it, you can install other drivers on the basis that if you can do it once, you can do it again.
Let’s try to install an updated device driver.
First of all if you have downloaded it as a .zip file, it needs to be extracted from there before you can install it. Then you will see an .exe (executable) file. If you have downloaded just a single .exe file you don’t have to do anything else, just double click on it to start running the installation wizard. If you follow the information message the installation will take you only few seconds.
Or there is another way to update a driver, you can do it manually.
After downloading the driver you need go to Device Manager (in Control Panel), choose the category of hardware you need and then choose the device you want to update the driver for. Right click on the device and go to “Properties”. On your screen will appear a box with a number of tabs, you need to select the Driver tab. Then you will see the button “Update Driver”, that’s exactly what you needed, just click on that and the wizard will start running. Afterwards choose the option Install from a list or specific location (Advanced). On the next message press the button “Don’t search. I will choose the driver to install” and on the next window click “Have disc” button. Then start browsing your computer for the location of the disc or the file which contains the driver you are installing
In the list of files you are allowed to set up you will see files with the extension .inf. An INF (Setup Information File) contains plain text and includes the information about the driver update found in the directory. In case there are no .inf files on display try to download the driver once again, because it might be that there is a problem with a damaged file.
Then just click “ok” and when you will be offered the option to choose hardware on the next window just find yours and press the “next” button.
If you will see a warning message about the driver not being compatible with your hardware, press “yes” and finish the installation process.
After finishing you might have to restart your computer but it’s not always necessary, it depends on the driver.
The Operating System Windows 7 might bring you some troubles during the installation process. The thing is that when installing on to your PC, all drivers and system files need to be verified. But there is a way to sort it out. First generate your own self-signed digital certificate (OpenSSL will be helpful in with this), then install it onto your system’s Windows as a trusted publisher. Afterwards you can use the Microsoft's Authenticode signing tool to sign the driver packages. After doing this the installation will continue without the OS presenting you with verification messages.
If you will need to un-install the driver you can easily do this too. There are two ways to do it.
The first way is just go to the Control Panel and “Add and remove programs” and find the driver you want to un-install. Click on “Remove” and the driver will be deleted completely with all traces.
The second way is just as simple, go in to Device Manager (for how to bring up this window see in the step by step guide above) then right click on the device that you need to un-install the driver for and choose the “Properties” button. In the tab labeled “Driver” click the button “Uninstall”. That’s done, your driver is removed.
http://www.bravofiles.com/ is a place for free driver downloads.
Andy G
Andy is a guest writer and operates Bravofiles a free website for drivers and software utilities. I recommend adding a link to his site in your bookmarks, it's a great site.
Dan
Thursday, March 24, 2011
Cleaning your computer of malware and protecting it from viruses the cheap and easy way.
My sister and her husband donated some hopeless computers to me recently, I had mentioned to them that if they had some dead computers they were just going to get rid of to donate them my way and I would refurbish them and put them to good use. They tossed me a pile, and got a big smile, and started to work on them.
After doing repairs that needed to be done I went about getting the operating systems up to speed. One of them was an Acer KAV10 notebook that was heavily infested with viruses and malware. I had to do a bit of research but what I found was that there was a way to get the little computer to be reset to factory settings. This is how I did it:
- · Press and hold the 'alt' key and tap the 'F10' key a few times you will directed to Acer erecovery management
- · At Acer erecovery management chose restore to factory setting
- · Then follow the instruction until finish
What that did was reload XP to the point it was when it came from the factory! I was pretty amazed that it worked but it.
On the other 2 computers after I did the repairs I then decided that the operating systems were worth saving so the first thing that I did was run Superantispyware on them to see what was going on. The scan found all sorts of things and software running in memory. When I find software running in memory scanning with Superantispyware it means you need to re-run the scan with Windows in Safe Mode.
The first thing to do is download all of the updates to Superantispyware, install them, then boot Windows in safe mode.
- · Do this by hitting F8 when Windows is loading. Windows will give you options for booting.
- · Boot in safe Mode then run Superantispyware.
- · Do a complete scan and remove all of the nasties.
- · When you are complete load Windows normally.
- · Your nasties should be squashed now.
The next thing to do is load some antivirus software, there are several free antivirus software packages out there, one of them Microsoft provides for free. It’s called Microsoft Security Essentials. It’s easy to download and install. And can be used until you decide to keep it or use something else.
Make sure you update Windows to the current level, by using Internet Explorer and going to Windows Update. This could take a while but is needed to make sure all of the fixes are done to Windows.
The last step is to Defragment your hard drive. That can be done by clicking on Start > All Programs > Accessories > System Tools and clicking on Disk Defragmenter.
You are all set, enjoy……
Subscribe to:
Posts (Atom)