Saturday, November 20, 2010

Turning a multipe doccument into a pdf file with freeware

Here was my dilemma, I needed to scan a 37 page document, and then turn it into a pdf that I could email to my brother in law who had graciously offered to help us figure out all of the legaleeze included in the document. The challenges ahead were how to scan the pictures, create the pdf and make it small enough to email easily. This is how I did it:

  • First of all I used my trusty HP Scanjet 3500c scanner for the hardware portion of the project. I used two freeware software packages to do the entire project Irfanview and a program called PDF split and Merge  You will need to download and install the IMpdf plug in for irfanview found on this page. Here are the steps I took:
  • The first thing I did was create a directory for the files I needed to scan.
  • Then I ran irfanview. Then clicked on file then click on Aquire/Batch scanning
  • This window will pop up, select multiple images.
  • Select the destination directory by clicking browse and selecting the directory that you created earlier to store you files, then click OK.
  • When you do this the software that you installed with your scanner will pop up. I would suggest that you select gray scale to make the files smaller right off the bat. I also had this software set at 200 dpi.
  • Clicking Accept saved the scanned document into the folder that I created.
  • You continue to scan files and they get filed sequentially into your directory as jpg picture files.

  • After you have scanned all of you files then it's time to batch resize and convert to PDF to make sure they are small file but still easily readable in the final pdf file
  • Create another directory for the pdf files..
  • In irfaview click on file then Batch Conversion/Rename
  • Set as shown above to resize and convert files to pdf. Make sure the output directory is the one you just created for the pdf files.
  • Click on advanced 
  • I wanted to shrink my file from the original 220 dpi files so I resized them by 50% as shown here
  • Click on OK and we are ready to create our PDF files.
  • Select the files you want to convert, click on all, then click on Start Batch.

  • A window will pop up for each conversion and you should be able to simply hit OK for each one. Make sure you don't have passwords set for the files.
  • You now have a directory full of individual PDF files.
  • Now let's combine them into one file for emailing.
  • Open PDF Split and Merge.
  • Select Merge/Extract
  • Click on Add and Add the files you want combined
  • Click ok, and you will see all of the files added.
  • Click on Browse select a directory you want the final file to be and give it a name.
  • Click run and presto change O and you have your finished file ready to be sent.
Now you may be asking yourself why not scan the docs and use something like OpenOffice to add pictures and then save the whole thing as a PDF? Yes, you could do it that way and it would work. But I found this way to be quicker that trying to format each picture inside of a word processor.
Scan, convert all, then combine is really pretty fast.

Dan

Monday, June 21, 2010

Installing Nvidia driver Ubuntu 10.04 Satellite Pro 6100

Yes I did it I got Ubuntu 10.04 up and running on my old Toshiba
Satellite Pro. I have OpenOffice running (and am writing this article
with it) I can print to the shared printer attached to my wifes
computer, I can scan documents into my computer life is good. Now to
make my video work really nice.
I noticed that I had no video driver installed so I was viewing
everything with default settings. This was all good and fine except I
wasn't using the capabilities of the built in Nvidia4 420 Go 3D video
card. This of course I had to change. But doing this was much harder
than I had expected. I will explain the steps I took to install and
make it work.
I had to search the Internet for pieces of what I needed, then do a
bit of trial and error to get it installed and working. I ran into all
sorts of stoppers like blank screens, no Xorg.conf file after loading
Nvidia driver. and the

computer not letting me edit Xorg.conf file I later created. There was
no step by step instructions until now.

  1. At the top Menu select System


    1. Then select Administration

    2. Then select Hardware drivers (The computer will now scan for
      drivers)

  1. The Computer will find an Nvidia driver


    1. Select Activate (The driver will not be activated until a
      reboot has happened)

  2. At the top Menu select Applications


    1. Select Accessories

    2. Select Terminal and type in the following in sequence.


      • sudo dpkg-reconfigure xserver-xorg -phigh (then hit the
        Enter key)

      • sudo nvidia-xconfig (then hit the Enter key)

      • gksudo gedit /etc/X11/xorg.conf (then hit the Enter key)
        You will need to enter your system password. This will open up a text
        editor and allow you to edit the Xorg.conf file.

    3. Look for the Screen section and add these two lines:


      • Option "UseDisplayDevice" "DFP" (add this right under
        Section "Screen")
      • Option "AddARGBGLXVisuals" "True" (add this under
        DefaultDepth 24)

      • Example Before:

        Section "Screen"
                Identifier "Screen0"
                Device "Device0"
                Monitor "Monitor0"
                DefaultDepth 24
            SubSection "Display"
                    Depth 24
                    Modes "1600x1200" "1280x1024" "1024x768" "800x600" "640x480"
            EndSubSection
        EndSection


      • Example after:

        Section "Screen"
                Option "UseDisplayDevice" "DFP"
                identifier "Screen0"
                Device "Device0"
                Monitor "Monitor0"
                DefaultDepth 24
                Option "AddARGBGLXVisuals" "True"
           SubSection "Display"
                   Depth 24
                   Modes "1600x1200" "1280x1024" "1024x768" "800x600" "640x480"
           EndSubSection
        EndSection

        d. Select File
        e. Select Save
        f. Reboot Computer


You should now be able to boot into Unbuntu 10.04 and have the
Nvidia video driver working on your Satellite Pro 6100. Of course this
will probably work on many other laptops so this information should
help others with similar issues.

Tuesday, June 8, 2010

The quest to add Linux to my Flash drive.

Every once in a while I get fed up with Windows, I swear that I will wipe XP off of my old Toshiba laptop and replace it with a free operating system that will not be so bloated and slow. I then always step back a step or so and think to myself “I still have programs that I like to run on XP that won't run on Linux.” I have tried splitting up my hard drive and dual booting but why waste hard drive space when I could stick a whole operating system on a flash drive and use it on any computer. So my quest began to find a Linux package that would be somewhat stable and operate reasonably for me to use.

I will cut to the chase and then tell you the steps you can take to do the same thing. After trying out about 10 different Linux packages on my flash drive I decided that I really liked Kubuntu. Ubuntu has come along way and I really prefer a KDE environment over others that I have tried. Plus it works really well for me.

Here is my system:
Toshiba Satellite Pro 6100 Laptop
P4 1.8 GHZ
1 GB of RAM
2 USB 1.1 ports
2 USB 2 ports using a PCMCIA adapter.
40 MB hard drive
Kubuntu on a 4GB flash stick.

My first hurtle was the fact that the BIOS for my laptop didn't have USB boot support. But I was able to work around it with a program called Plop Bootmanager. This gave me the ability to choose one of my USB ports as the Boot drive. I am still only able to boot from the 1.1 USB ports but it's better that nothing. I think that the driver for the USB 2 ports that are on the PCMCIA card don't load until after the boot menu. Click this link Scroll down to “Harddisk install using the Windows boot menu (2K, XP and VISTA)” and follow the instructions to allow USB booting on a machine that doesn't have the USB boot option in the BIOS.

If you have a flash stick that doesn't let you use the full space on the disk because of secure space reserved on the flash you might want to reformat the whole disk. Now this is easier said than done, my 4 GB flash drive was split into 2 partitions. I wanted all 4GB in one partition. I found a very small free utility from HP that reformatted the flash drive into 1 partition. It's called HP USB Disk Storage Format Tool.

The next step was to actually put a Linux package on my flash drive and test it out. The best way to do this is to use Universal USB Installer found on pendrivelinux.com. There is a list of many Linux packages to choose from. I started out thinking I wanted a small package for my flash drive and tried some of the small packages like DSL (Damn Small Linux), Puppy Linux, and Slax. They were all kind of fun to play with but a little too unstable for me. I finally decided on Kubuntu. With this little program you can even download the exact disk image you need. Remember to use persistence if it is needed. I found 2GB worked just fine for my setup. Persistence allows you to save changes on your flash stick.


Update:
After playing with Kunbuntu on my hard drive for some time I opted for Unbuntu the regular installation. It just worked better for me all the way around on my Toshiba Satellite Pro 6100. I was having some issues with scanning that corrected by switching.
 

Sunday, May 23, 2010

Netflix streaming video to your TV, so cool and basically free.

About the time I got my coupon for a digital converter box I got fed up with my cable company. All I wanted was to be able to watch the very few TV shows that I enjoy and PBS. Cable was going to charge me some outrageous price to watch basic cable so I dumped them and switched my internet from cable to DSL and got my TV from over the air channels using the digital converter box. We were getting most of our movies we wanted to watch using Netflix getting the 2 DVDs out at a time for $14 a month was a real bargain. No more trips to the video store and we could control our choices from our computer. I knew they had streaming video you could watch on your computer screen but one day I thought I want to watch these on my TV.

I started thinking about taking the outputs of my laptop and hooking them up to the video input to my TV when the same day I see an article talking about Netflix releasing a disk so you can get Netflix through a Wii. WOW we had just purchased a Wii for Christmas for the whole family and it hooks up to the internet with a wireless network adapter that is built in. I got on Netflix site and reserved our disk, it wasn't but a few days later when Netflix announced that they were shipping Wii disks. I clicked on a button to have them send me our disk right away and the disk showed up the next day!

After inserting the Neflix disk into our Wii we were up and running in no time. All we had to do was enter a number off of the disk online on Netflix to activate. Now we can watch any movie available for instant view anytime we want, or we can pick from a large selection of TV shows. (I can watch Myth Busters again, yeah!) The Wii doesn't show everything available for instant view, you can search online and add movies and TV shows to your instant queue, they then show up instantly on the Wii to watch. If you can't watch the whole show you can exit out of it and Netflix remembers where you left off.

I always thought Netflix was a bargain for DVD rentals. But for $8.99 per month you can have DVD rentals and unlimited streaming video into your home. The quality of the videos isn't HDTV quality but so what, they are crystal clear and as nice as any DVD I have rented. You can also get disks for the other game consoles and internet connected devices, the selection is large.

I would have to say this is the biggest home entertainment bargain available today, I love it! Now my problem is trying to keep my kids from turning into TV vegetables. It looks nice outside maybe we will go for a bike ride.

Wednesday, January 27, 2010

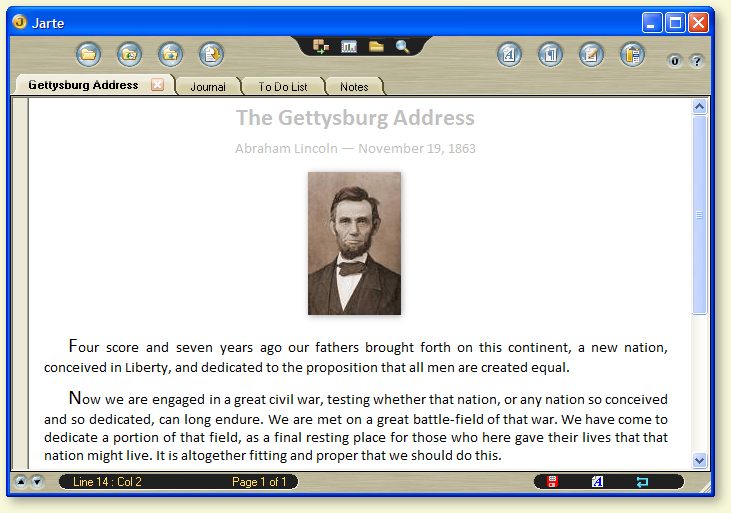
Jarte, my new favorite Word Processor

I purchased my laptop used on ebay, it had Windows XP installed and has the sticker on it showing that I actually have a valid copy of Windows XP. I didn't get an XP disk to go along with it however which I thought was unfortunate but I had a copy of the XP disk for another computer that we own. My thought being if I ever needed to re-install something maybe I could use that disk. So what does this have to do with a new word processor? Well the laptop also came with Microsoft Word installed on it. I didn't get that disk either, I really didn't know if I had a legit copy or not and didn't intend on using it because of course I would much rather use a free word processor instead. One day I decided to open Word to see if it worked. I got a message saying that I didn't have a genuine copy of the program. You could click on a link to learn more, I did that and Microsoft said it wanted to install some other software onto my computer. At this time I had had enough of this BS and went on the internet to get a fresh copy of Open Office. But before I downloaded it I paused for a moment and said to myself "What else is out there right now?"

After doing a search on Google I found the web site for Jarte. Jerte is a free word processor that is compatible with Microsoft word and can read and save file in Word, Rich Text, or text file format. Those word processor formats are really all you need anyway. But you can also save a file as a PDF or as a HTML file.

The first thing that struck me about Jarte was the interface, the interface looks very slick, but is very easy to use and is customizable in several different ways. You can switch back and forth between minimum, compact, and classic by clicking a button and getting different tools displayed, you can customizes each one of those to display any set of menus you wish. The true test of an interface for me is can I play with it for a few minutes and have it figured out. I don't want to read the instructions on how to use a word processor. I was pleasantly surprised to find out that I could figure out Jarte. I was able to find all of the essential things that I use a word processor for very easily in a few minutes.

Here are some of the features that I really like:
  • Screen Capture: When clicking this button it shows my desktop then I can select an area to capture and click it. Going back to Jarte I simply past it into the document. Wow that makes it very easy to make documentation that references anything else you have on your computer.
  • Export to PDF. It is so nice just to be able to just do it without using a bunch of other bloated software to turn my file in to a PDF.
  • Finding features that I need: One of my main big gripes about programs like Word (other than the price) is that I can't easily find features that I need to use. I don't want to have to hit the help file to figure out how to center my text or with some of their newer version simply how to save my work. It's a huge waste of time if you have to do that. I'm going to use the tool that is easy to use. Jarte has some easy Menus and bars that show pictures of functions that don't really need much explanation.
  • Jarte comes with a dictionary in many different languages. My son is in a school where they use English as well as Spanish. This makes editing a lot easier for us.
Jarte also comes in a version that you can pay for. I don't see me doing that anytime soon because Jarte already does everything I need it to do. However if you want to purchase Jarte Plus it will only set you back $19. A bargain when you consider what Microsoft hits you up for Word, $229 at the Microshaft store.

Tuesday, January 26, 2010

The Internet Security 2010 Virus

I did battle with the Internet Security 2010 Virus yesterday and I think I finally beat this malicious piece of programing. This Trojan poses as a malware removal tool but in fact infects your computer with malware. I was finally able to kill it by using SuperAntispyware with Windows booted up in safe mode. (It's always best to run removal software in safe mode, this way the virus has less places to hide when you run the removal program.) After removal I couldn't connect to the internet with Firefox. I could connect to the internet using a game that connects to game servers however my web browsers, Avast, and Malwarebytes,couldn't connect. Which means that the virus had turned something off. When I ran Internet Explorer it gave me an option to diagnose the problem. I didn't expect much but decided to give it a try. Well Internet Explorer came back and told me a setting needed to be changed and asked me if it wanted it to fix the problem. I told it yes and everything was fixed.

I have come to the conclusion that writers of spyware, malware, virus, and trojan horse programs should be put to death in a most painful way .......... or at least ban them from using a computer for 80 years. This would cause their brains to explode and take care of the painful death part. A Win Win situation!

This particular piece of software is really scary especially when it looks like it is a real program. It eventually gets to a place where it wants you to enter credit card information to steal your money. Here are pictures of what the InternetSecurity 2010 Virus will look like if it infests your computer.

I hope this helps, and may the force be with you.

Dan